This annual mountain bicycle relay race (one team member does a lap, then passes the baton to another team member) event happens for 24 hours (noon to noon), several of those hours being at night.
For night riding, participants need:
Rear light: Participants need a flashing red taillight, which is cheap and ANY small bicycle flashing red light will do because the goal is only "to be seen" by other riders.
Front light(s): However, for the front lights, not any light will do. The goal here is "to see", which means that if you are travelling on a bike through a forest in complete darkness at high speeds you will need some serious lighting; smaller lights used on your road bike or cruiser bike will probably not cut it.
As mentioned earlier, this article is aimed at riders who probably will only ride at night during this event or maybe 1-2 times more a year. It may not be justifiable to spend 500-1000 dollars on a set of lights for such low usage. For this use case, let's explore some options below.
Let's start with information and recommendations (tailored for the 24 Hours of Summer Solstice event, and somewhat tailored for a beginner/casual rider) you need to know about:
Use case:
The event uses the Albion Hills Conservation Area's trail system, and the event's course (which changes every year but includes lots of familiar recurring favorites) is designed as a fast and flowy course. Not too many technical sections. Plenty of bypasses. This is not a downhill course. So you won't necessarily need the most expensive or best lights available.
The light should be OK for a casual rider not going super fast or obsessed about shaving minutes off their ride time, so again, no need for the best light(s) on the market.
Cost-cutting: No need for intelligent lighting that adjusts to your riding. No need for phone app connectivity. No need for changing lighting modes on the fly using a handlebar-mounted remote (to save some precious seconds); the rider can stop and spend 10-20 seconds to change modes if needed.
Rider will also have ridden the same course once during the day, and hopefully will remember some parts, so that could be some help with not needing the best light out there.
Beam spread: When purchasing a light, there will be mentions of beam spread (also called "bundle"), expressed in degrees.
Spot: tight "hotspot" bundle of 20-25 degrees, best used as a light on a helmet.
Flood: wider bundle of 30+ degrees, best used on handlebars.
Hybrid: some lights will have more than one type of beam built-in (spot/flood/both) that you can switch at the touch of a button.
Duration: A seasoned rider will complete the course in under an hour to 1.5 hours. Beginner riders will be out there for 2 hours or more; sometimes 3 hours if they "walk off" every obstacle, so factor that in when purchasing lights. You can run the lights at half-power for twice the duration.
Lumens: Not the most accurate measurement (abused especially on cheap Amazon lights to the point of lying to the customer), but on reputable lighting companies should be one way of planning your light purchase. Try to get a minimum of 700 lumens for a minimum of 3 hours. If that means purchasing a 1500-2000 lumen light and running it at half power to get 3 hours of light (even if you are known to finish your lap consistently under 2 hours), then that is what you need to do.
Best/Safest lighting configuration for MTB:
One helmet light: High lumens, 20-25 degree bundle. Make sure that the light you are looking for here has a helmet mount. It also MAY be possible to use an o-ring setup as an improvised helmet mount, but don't rely on this. The vendor should provide a helmet mount.
One additional light for your handlebar: High lumens (but does not need to be as high as the helmet light), wider bundle of 30+ degrees for your handlebars.
Batteries: the batteries should ideally NOT be built-into the unit to allow for replaceability (batteries are usually good for 500 cycles if well-maintained (fully charged once every 3 months)), and swapability (and/or sharing a light between multiple participants with extra batteries). There should be a separate battery unit with a cable connecting it to the light. This battery unit can be mounted on your bicycle frame (for handlebar configuration) or to a backpack/hydration pack (for helmet configuration). Hydration packs are usually recommended for the event anyway over bottles/bidons because you'll see bottles accidentally lost throughout the course, especially on rough areas... but it's understandable that some people do not like hydration packs. If you have a helmet mounted light and will not be using a backpack/hydration pack, you can opt for a light with a built-in battery, but you will not be able to swap batteries. You can also attach any separate battery unit to your helmet but it's quite a bit of weight on top (or the back of) your head.
Battery size confusion: If using batteries from the same light vendor, there is a chance that the battery connections are interchageable. Remember which size battery goes with each light. Otherwise you may experience the following issue: In one past event, one participant did not have the batteries correctly hooked up to the lights. He had the higher-lumen helmet light connected to the smaller battery and the lower-lumen handlebar light hooked up to the bigger battery. So he ran out of power on his helmet light and had to rely solely on his handlebar lights (which had PLENTY of power). This was still more lighting power (better technology) than participants used to ride with just a couple years prior, but still quite upsetting for the participant who was not a seasoned rider.
Ease of use: Beginners or people who need the light only once a year will not care about features such as a handlebar-mounted remote, intelligent lighting that adjusts to your riding, or Bluetooth connectivity to a phone app to read battery life and customize lighting. The light should have an easy-to-read way of figuring out how much power you have. The light should also have an easy way to turn the light on or off and to switch modes. Usually all on the same button (holding for on/off; short press to switch modes).
Waterproofing: There should be some level of waterproofing built-in in case it rains during the event.
In past editions of Chico Racing's 24 Hours of Summer Solstice, a reputable lighting company would offer lights for rental or sale. With rentals, they would take care of providing you with a fresh battery, even if you share your lights between team members.
PROS: This is the smartest option for someone who only needs lights once a year and for this event only. This ensures that you get recent light technology, a charged battery, and any wear and tear does not become your problem. I say this because of the wear and tear on lithium-ion batteries if they get completely discharged, and also because those LEDs get hot, and there is the higher demands placed on the lights when they are used by more than one participant. To prevent overheating and failure, there should be a cooldown period between race participants. In past events, two sets of lights were rented and split between participants, allowing one rider riding with one set of lights while the other set of lights cools down.
CONS: Availability could be an issue. You need to monitor the event's website for the availability of light rentals, and then email the supplier at the address provided by the event organizers to reserve some lights. The supplier (ex: NightRider, Light & Motion) can change year over year.
2022: ***Unfortunately (probably due to COVID), the option to rent lights at the event is not available for 2021 and 2022, so this is not an option. Let's hope this is only temporary for the 2021 and 2022 editions of the event.***
Kryptonite: All lighting units seem to have built-in batteries (as opposed to separate bettery units) so perhaps skip those.
Light & Motion: I personally had a good experience in renting them in previous events. Good products that were easy to use at the time (2012-2014). If you are looking for lights before June (when the 24 Hours of Summer Solstice event happens), check to see if Light & Motion's website has a Memorial Day sale around the last few weeks of May for significant savings.
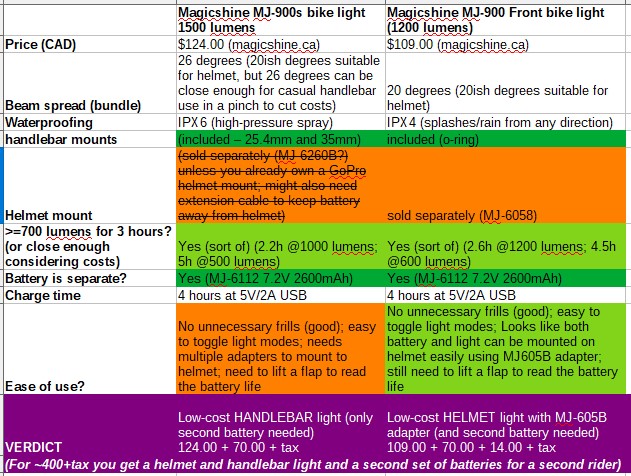
Magicshine: Looks like they have good products as well.
(any other brands I come across that I have time to look into I will add here in the future)
Here is an example of research into a low-cost 2-person (1 set of lights; 2 sets of batteries) light setup: NOTE: This is good as long as the riders sharing the lights do not go consecutively... even though you (as a light-sharer) have a fresh battery you gotta give time for the lights to cool down, and to mount the lights to the other rider's bike/helmet. If you REALLY want to cut costs and have a big enough team, you can space out the turns of the light-sharing riders so that you can fully charge one set of batteries for both riders. This works well for 6-10 person team; for 4-5 person teams you have to make sure you have at least 2 sloooow riders with other batteries between the light-sharers to give enough charge time (it can take ~4 hours to charge a fully depleted battery at 5V/2A USB))
Looking at reviews and YouTube comments, half the people buying cheap Chinese Amazon/AliExpress lights are going to be happy about how they saved money.
The other half mention problems that are hard to ignore for some:
Battery cells will be from less reputable brands with questionable quality control and could catch fire (ex: when charging); you'll need to get a "LIPO bag" to contain your batteries during charging in the event a battery-related fire occurs (remember the hoverboard fires and recalls of the last decade), and never leave those charging batteries unattended.
The charger plastic cover accompanying some of those lights has been known to break and leave an exposed metal part in the wall socket waiting to electrocute you unless you turn that specific circuit off at the breaker panel.
Corrosion at the battery points and the control board over time.
Poor to nonexistent waterproofing (but you can do your own waterproofing solution for it (ex: Ziploc bag))
Any claim of ridiculously high lumens (ex: 5000) is either a lie, or theoretical numbers for the LED emitter itself and does not factor in other components of the lighting system
The LED emitters may not be CREE but a counterfeit such as LatticeBright (not as battery-efficient and not as bright)
When accidentally left plugged to the light during storage, the batteries in those cheap units can discharge rapidly to the point where they become no longer useable/chargeable. Lithium Ion batteries do not like being fully discharged, and some battery designs will not charge if discharged below a certain safe voltage number for safety reasons due to battery chemistry.
When riding at night with lots of participants, some unwritten rules are in place:
You will hear faster riders behind you (you will hear the coasting of their freewheel or cassette) and can plan on pulling over to a safe spot on the trail and letting them pass. Point your light forward ahead on the trail to provide more lighting for the passing rider to help them pass you safely.
When you are stopped on the trail at night, NEVER point your light at a passing rider; you will blind them. At best, they will be angry at you; at worst, you will cause them to crash, possibly into you. This mistake is easy to do because instinctively you want to look and see how close the other rider is coming, but if you have a helmet-mounted light, this could lead to disaster. If you MUST look behind you (for example, when you want to be sure noone else is there so that you can safely get on the trail again), stop and cover the helmet light's beam completely with your hand (cover the beam, not the lamp, because these lamps get hot to the touch (ooh, and wear cycling gloves)). You think you will not be able to see, but you will see the other rider's light so you will know where that other rider is.