Microbric Edison
DISCLAIMER: I am not sponsored (I wish I were) by Microbric. I purchased and own two of these robots, along with an EdCreate expansion kit. Heck, I have not even won one (they have a monthly draw to win a robot among their worldwide newsletter subscribers). The opinions and experiences mentioned on this page are my own, and I have listed some quirks with the product and the easy solutions for them.
In Canada, the Edison robot and EdCreate expansion pack are available at Amazon.ca and Best Buy (Best Buy sometimes has a sale and the price was the lowest I have seen for the robot and expansion pack there when on sale and qualified for free shipping) through a 3rd party called Contempo Views (which is probably part of another company called EMR Shielding Solutions). Sadly, buying from the EMR Shielding Solutions directly seemed to be the most expensive option last time I checked (early March 2023). |
Meet Edison, the affordable (compared to LEGO Mindstorms) LEGO-compatible robot from Australia. It's been around since 2015. Notice the LEGO-compatible studs on top (and on the wheels), and the LEGO Technic-compatible holes on the sides. You can also see a picture of the LEGO-compatible anti-studs at the bottom later on this page. More importantly, each wheel can be individually taken off to reveal a LEGO Technic-compatible axle connection for each of the two motors. However, the Edison does not interact with any LEGO software or mobile app; the Edison uses its own browser-based user interfaces (which can be used with any laptop or tablet without downloading or installing anything) for programming the device (more on these interfaces later on this page).
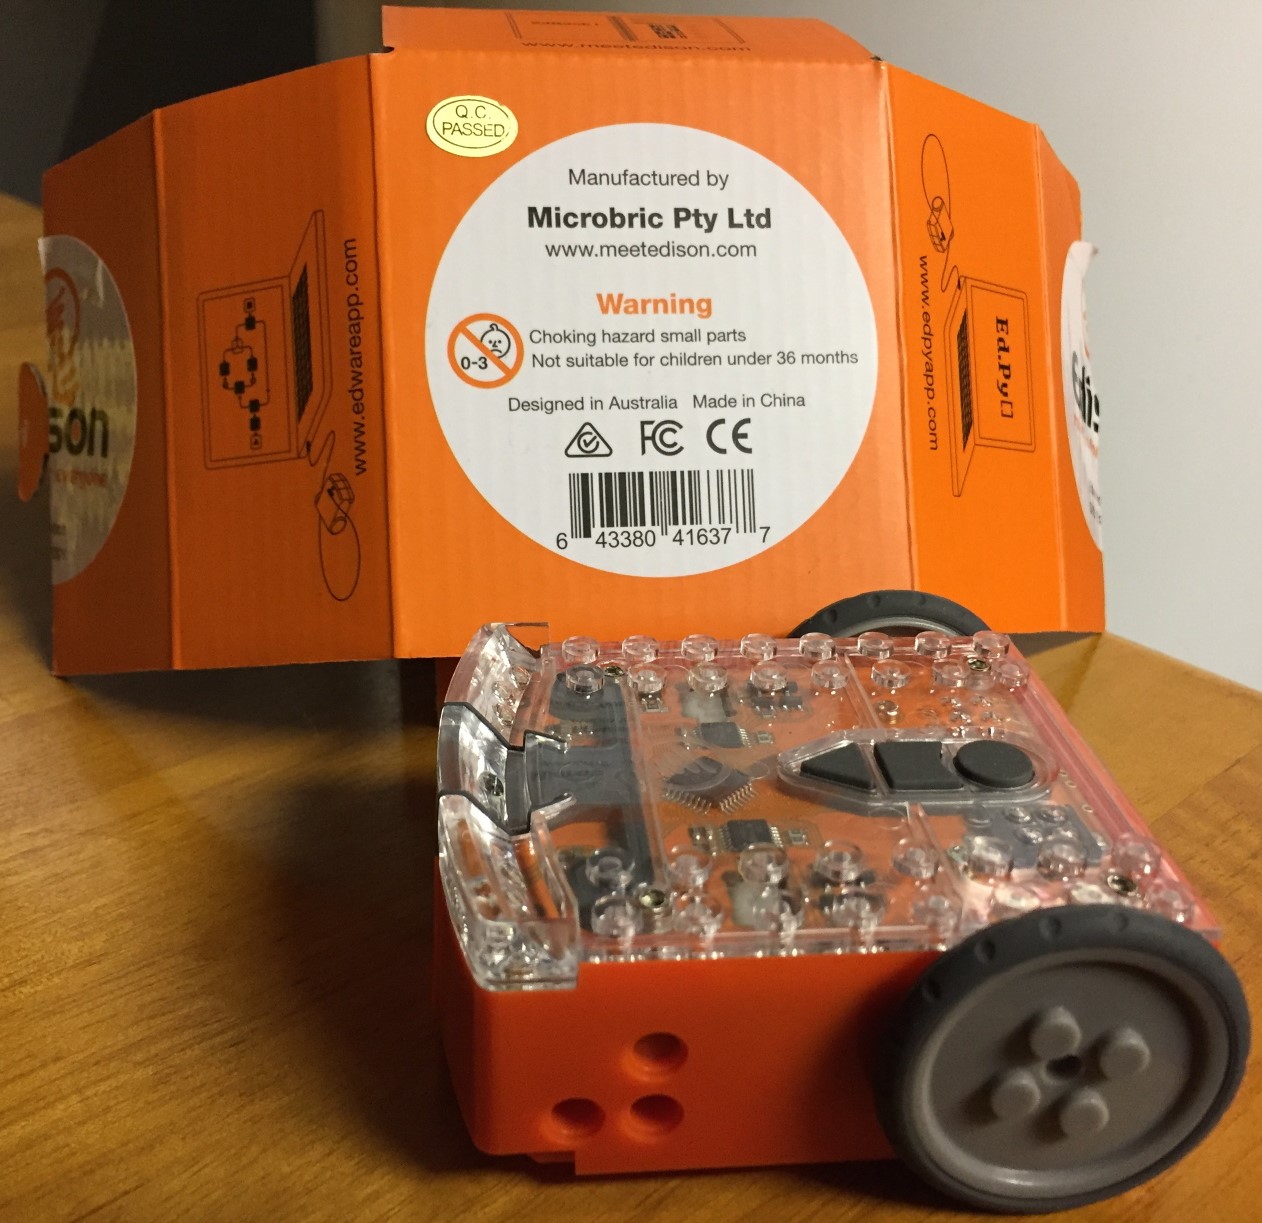
Edison comes with two wheels in the back. For the front, there is a tiny plastic "skid" (that is what Microbric calls it) that reduces friction to a minimum by reducing the contact surface to less than 1 square millimetre (if you were to put front wheels in the Technic holes, you would find that the additional contact surfaces would actually hinder Edison's turning ability!).
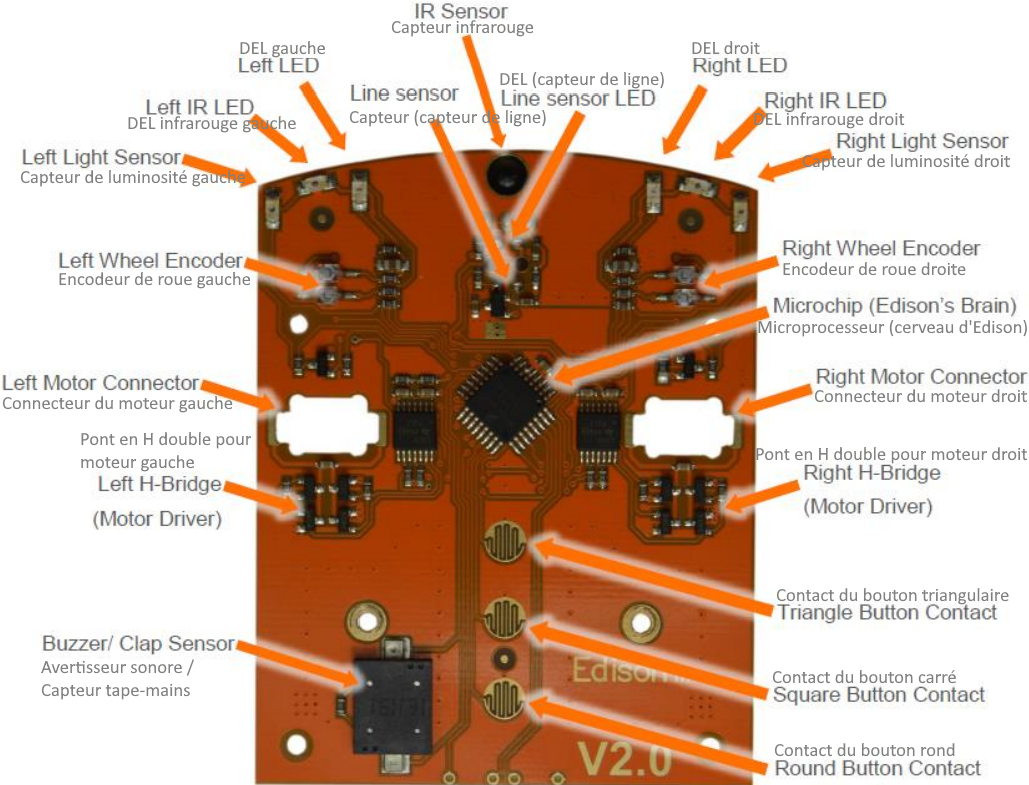
Edison packs the following sensors (and wheels and battery compartment (4x AAA batteries not included) and an additional light emitter and sensor (for line tracking) at the bottom) in one small (82mm L x 75mm W x 38mm H) package:
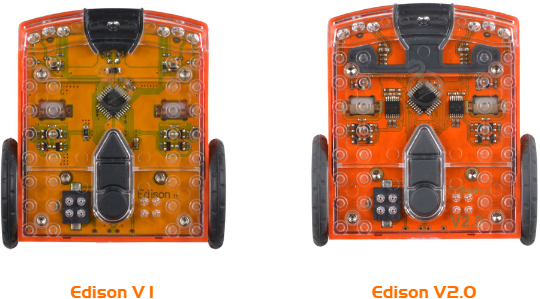
You need to know that there are two major versions of the robot out there.
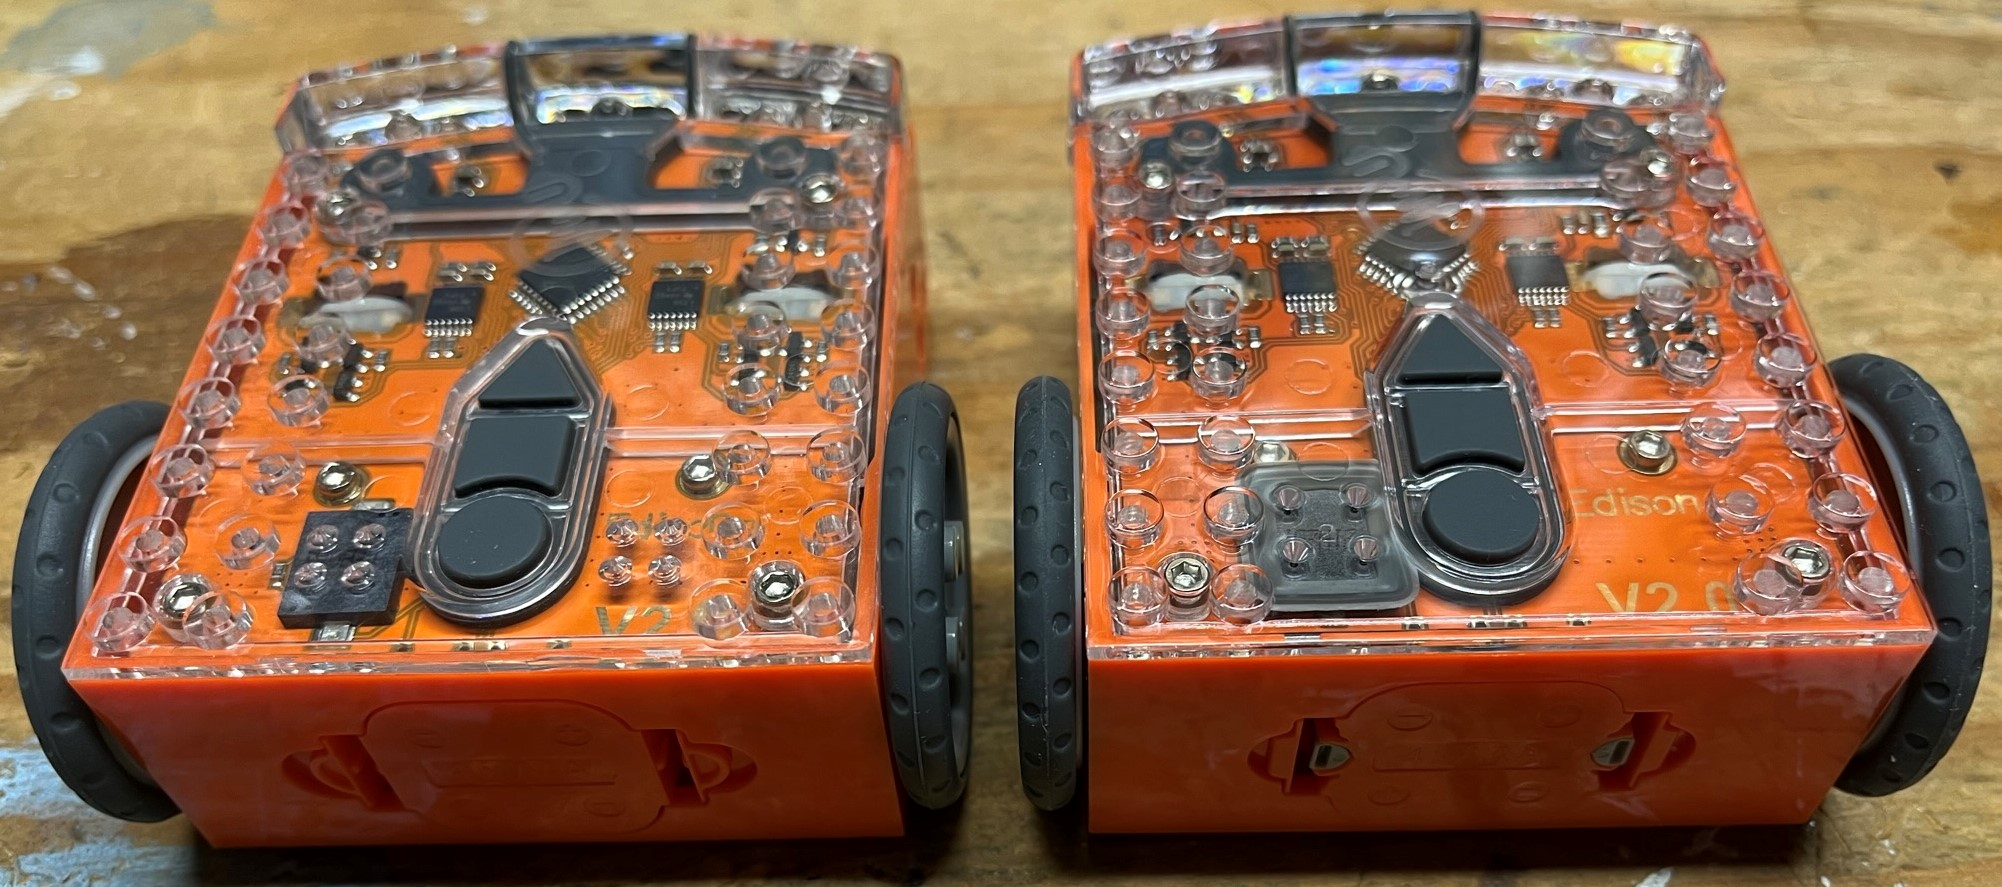
Version 1.0 (shown left in the picture below) will need a firmware update to do most (if not all) of what version 2.0 (shown on the right of the picture below) can do.
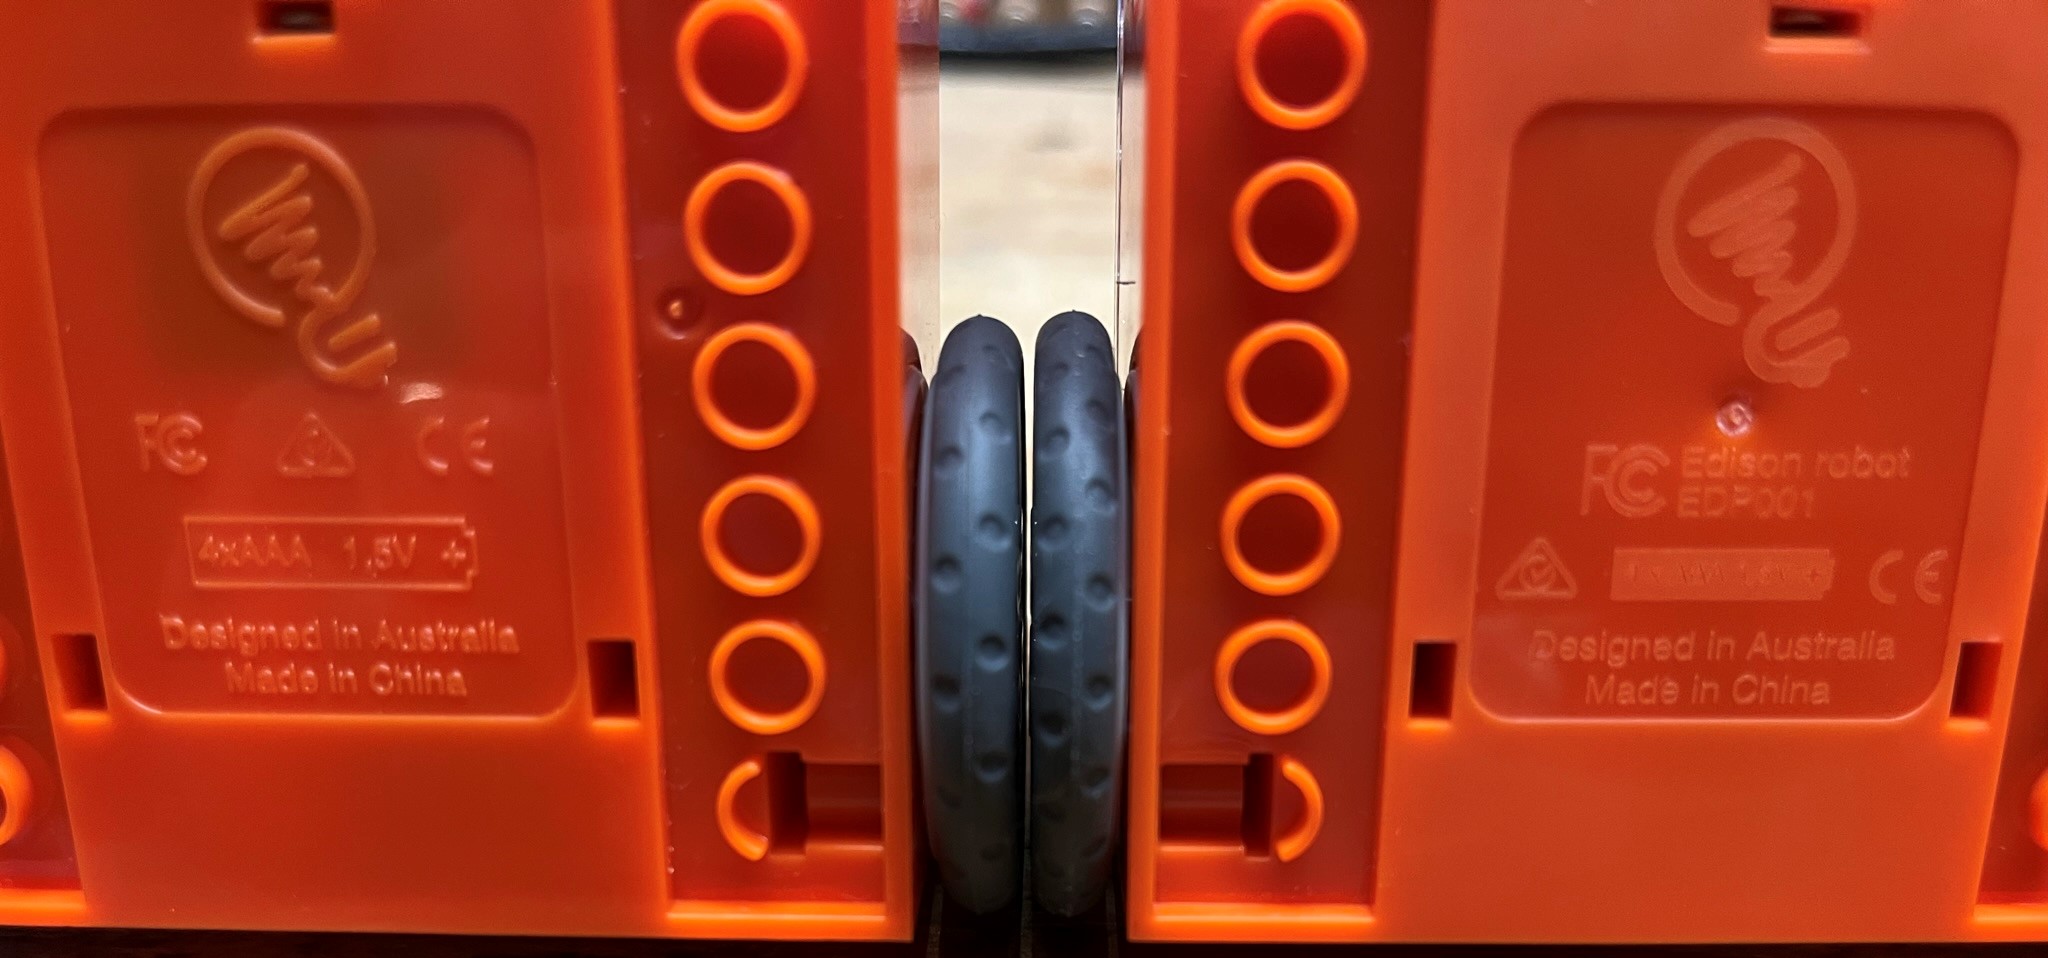
Version 2.0 is the most common one I am encountering. Of the version 2.0, there are at least two models I have encountered (which I own).
The one on the left is the older pre-2018 model (needs firmware update), and one on the right is the latest (no firmware update needed as of 2023-03-03). Notice how the engraved information on the newer model on the right is not protruding as much as the old model... probably there were reports of possible interference with the rubber buttons when Edisons are stacked on top of each other as part of a bigger build? (Click on the image below for a larger version)
The newer model (on the right in the picture below) also comes with a lockable battery compartment in the rear. Use a small screwdriver to rotate the gray locks so as to prevent someone from loosening the clips (right now the locks are not engaged, allowing freedom of clip movement). Not sure how necessary this feature is (maybe kids in STEM classes were messing with the 4 x AAA batteries from these robots?) but I am glad it's there. (Click on the image below for a larger version)
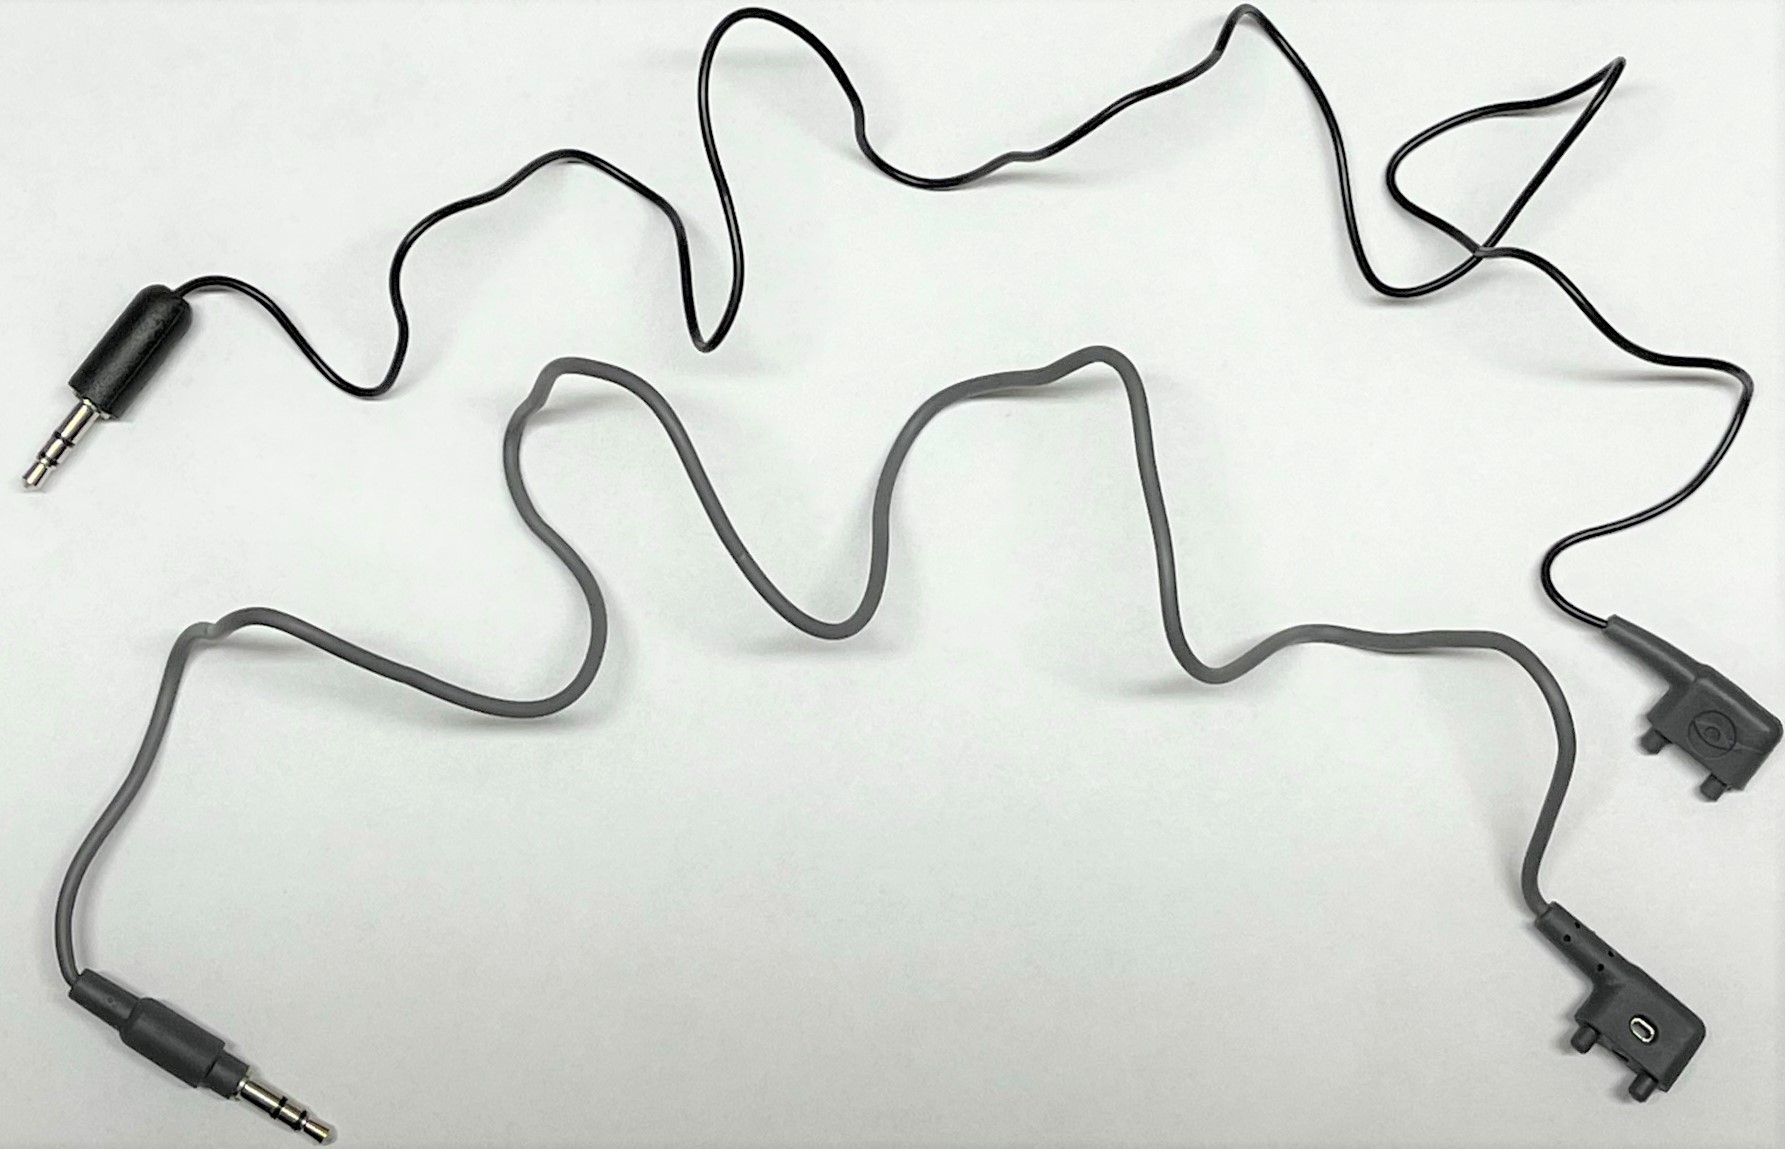
The included EdComm cable between the two versions has also received an upgrade. The newer model is thicker and its audio jack connector is better-suited for phone/tablets with a protective case. No USB connectivity here; one-way communication is made between the computer's audio jack and the bottom light sensor using a sound clip (you'll see Microbric call it a WAV file during compilation of your EdBlocks/EdScratch/EdPy program). Interesting system... until you lose the proprietary cable. But there are spare cable/parts kits available for sale.
Now that you've seen Edison, you may be wondering what can this robot do?
Let's list the different ways to program the Edison robot (please go to https://meetedison.com/robot-programming-software/ for more information, student guides, teacher's guides and video tutorials):
Printed barcodes (4+ years old):
Get younger kids playing with the Edison quickly. Place the Edison to the right of one of the available barcodes, and press the round button 3 times to have Edison drive over the barcode and activate one of the pre-built programs below:
- Control the Edison's movements through hand clapping.
- Follow a black line on a white background.
- Avoid obstacles.
- Follow the light of a flashlight.
- Change direction upon encountering a black border (marker or electrical tape) on a white mat (bounce off an arena's borders).
- Detect one or more Edison robot(s) and sumo wrestle it(them) out of a black-bordered arena.
- Program 8 commands (forward, back, turn left, turn right, spin left, spin right, beep, play a song) for use with one of your regular TV/DVD remote control(s) as a remote controlled vehicle.
EdBlocks (7+ years old):
Horizontal, no-code block-based programming environment, kind of like the LEGO Powered Up app.
Available online (can be run from a browser) at https://www.edblocksapp.com/.
EdScratch (10+ years old):
Vertical, no-code block-based programming environment based on MIT's Scratch language. Provides more access to Edison's sensors/features than EdBlocks (ex: in EdScratch you can make Edison detect/react to the motor straining more than it should) but not everything.
Available online (can be run from a browser) at https://www.edscratchapp.com/.
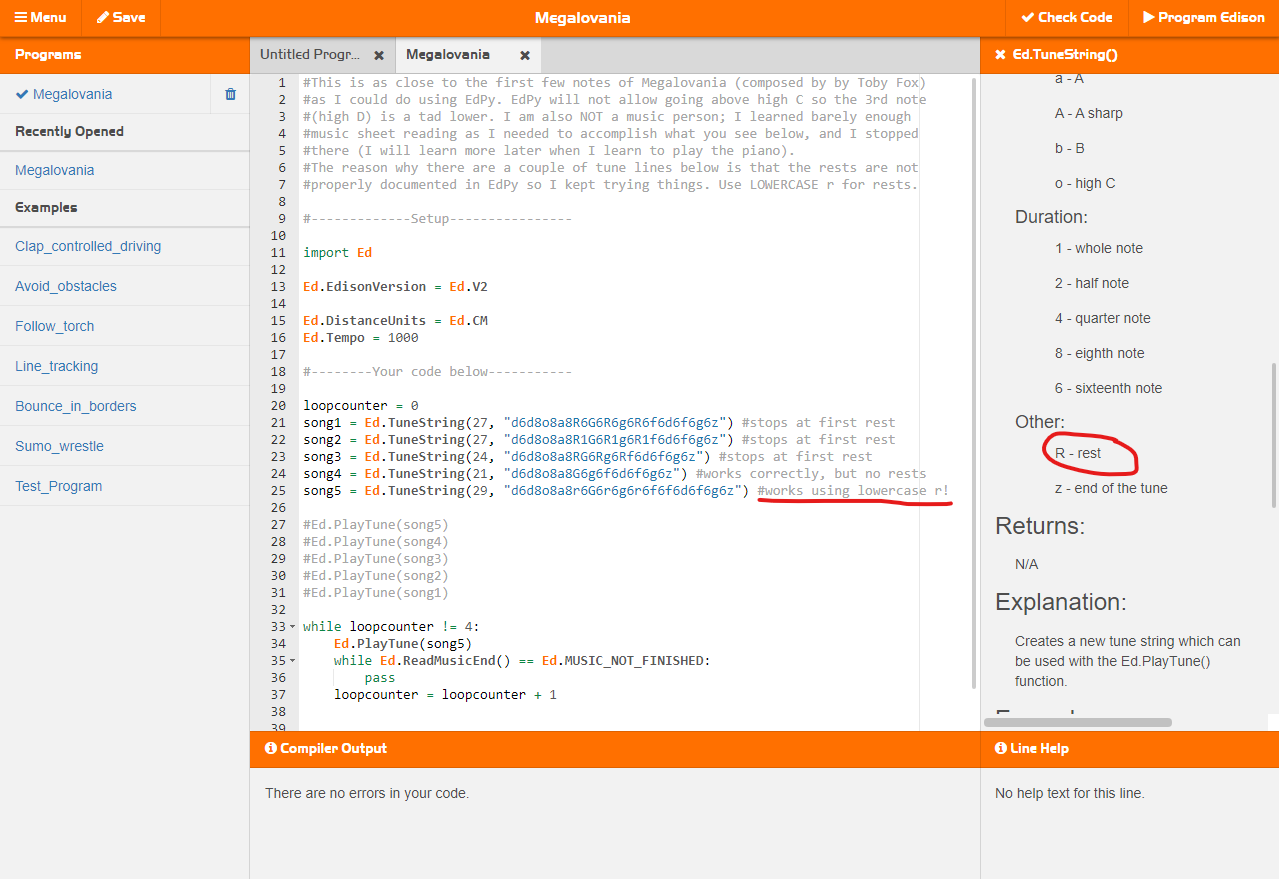
EdPy (13+ years old):
Text-based programming language based on Python. Full access to all of Edison's sensors/features. Prior familiarity with text-based coding might be required.
Available online (can be run from a browser) at https://www.edpyapp.com/.
NOTE: There may be references to an EdWare app in documentation, but please note that this was the old way to program for Edison, and it's been retired since 2018.
You may be wondering: What if the company goes bankrupt and the browser-based interfaces are no longer available? The barcodes will always work because they refer to programs hard-coded into the firmware. Download the barcode list and the barcode-related study guides as your personal backup to protect your purchase. You can also download yourself your own backup of the Windows/Mac/Linux/Android/iOS versions of the older (~2018) EdWare app while it's still available.
Here are some quirks I have noticed as part of my first 2-3 days with the robot:
Unboxing:
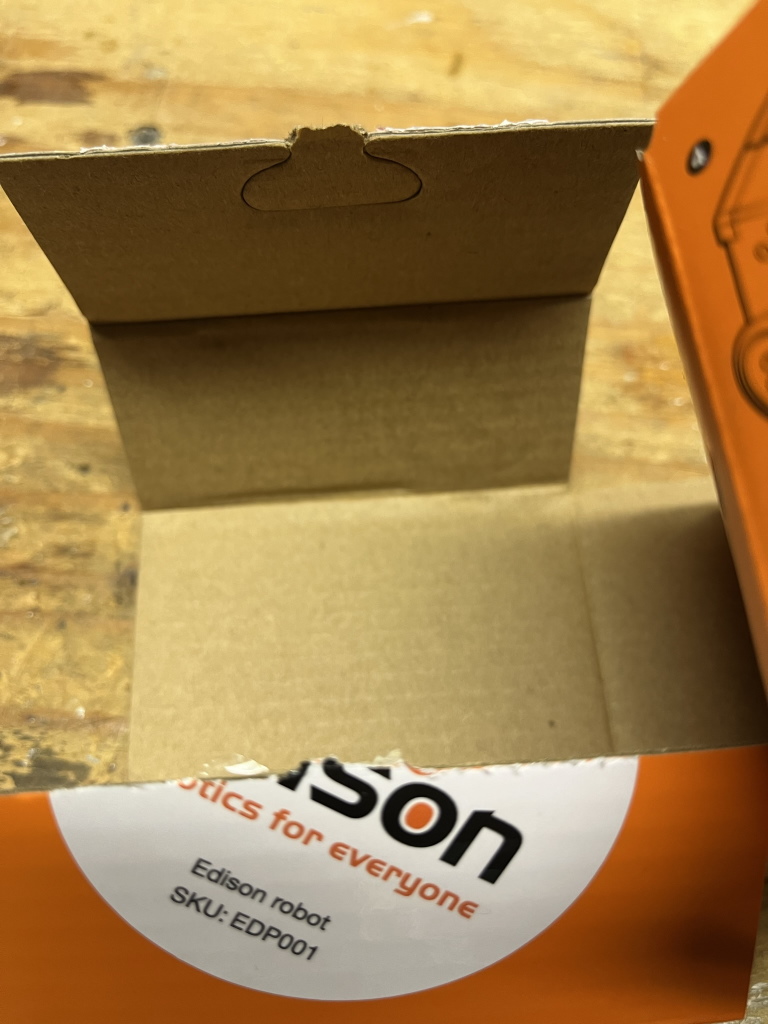
Peel the sticker off (instead of cutting a straight line through the sticker) otherwise you'll end up with a rip in the box as pictured here:
Keep the box, as it contains a barcode and URLs along with instructions (to save space during shipping, and paper!).
Other than that, the packaging was nice and cleverly compact. The manufacturer put the cable and spare transparent skid(s) inside the battery compartment to save space, and then created a space (punched a hole in a non-exposed part of the cardboard, essentially) in the packaging for the already-mounted transparent skid to save even more space!
Barcode program: Line tracking:
The Barcodes and Edison book says that the black line (on a white background) has to be a minimum thickness of 15 mm to be caught by the line sensors.
I printed the oval example from the A4-sized document into Letter (the paper size used in North America) and the line thickness was 13mm and it was fine. You *may* be able to get away with as low as 12mm (I wrote a 12mm line with multiple passes of a black permanent marker on regular paper (multiple sheets stacked in case of ink passing through to the surface the paper is sitting on) but 12mm may be unreliable. 10mm and lower did not work.
The paper (and any lamination if you go that route) must be matte; it will not work on glossy paper because the sensors rely on a lack of reflected light to define the darkness of a line.
Also, if you are considering printing the EdMat you have to print it on A1 (59cm x 84cm) (23.2in x 33.1in) sized paper. I tried on a printer that can print 11x17 (to see if I can get away with NOT going to a print shop) and the lines were too thin for the robot to follow the line, and the barcodes on the EdMat did not work at 11x17 or smaller, so use A1 (59cm x 84cm) (23.2in x 33.1in) size.
Barcode program: Remote Control driving:
On some TV/DVD remotes, if you use the directional arrows buttons (for convenience) it may make the Edison do the same instructions as what you would've assigned the volume up/down channel up/down buttons.
For best results, I programmed the numbers on the remote to actions.
As of January 2023, the barcode list seems to have the turn (and spin) left and right barcode listings inverted.
Barcode program: Clap-controlled driving:
Forget about clapping your hands, especially 2 claps. One clap works 50%+ of the time; two claps work 10-20% of the time. Happens regardless of noise levels in the room or intensity of clap, or how close you are to the Edison. Clapping once or twice sees to trigger "nothing" or "one clap".
Instead, tap the robot itself once or twice. Or tap the surface the Edison is on once or twice.
The most frustrating part of this mode is that the act of placing the Edison on a table may count as a clap. So you have to ever-so-slowly and carefully place the Edison unit on the table in this mode if you need to move it. Pressing Play to start the program makes Edison turn right immediately.
I had zero issues downloading a EdBlocks/EdScratch/EdPy program I made to the Edison using the EdComm cable when I followed the instructions and made sure that the volume was set to 100% and that no other sound sources were plugged in and running. There was no need for the Troubleshooting section from my end.
I discovered issues with EdPy with regards to music playback. Both issues are listed in the Known Issues section below.
I also purchased the EdCreate expansion pack. It is a number of LEGO Technic-compatible pieces, along with drive belts, to use in combination with one or two (depending on the project) Edison robots to create the following projects:
- EdTank: A remote-controlled tank (with one Edison) or a remote-controlled tank that can fire rubber bands (with two Edisons)
- EdDigger: A remote-controlled excavator/digger with a scoop that can be raised/lowered.
- EdRoboClaw: A remote-controlled driveable articulated robotic arm.
- EdCrane: A remote-controlled crane with a magnetic hook which you can raise and lower.
- EdPrinter: A pen plotter which is run using two Edison robots programmed using EdPy.
- And more (through EdChallenges).
Here are some additional links: